Databricks is great for processing data, and out of the box comes with 'Jobs' to automate and schedule notebooks. If you want more control over these triggers, customize the notebook parameters or have your own orchestrator, you could also trigger these notebook runs via another resource, such as a Web App. We can use the Web App's managed identity to run Databricks notebooks. This is a powerful way to automate and secure your data processing workflows, and it's surprisingly easy to set up.
What is a Managed Identity?
Before we dive in, let's quickly define what a managed identity is. In Azure, a managed identity is a service principal that's automatically managed by Azure. It provides an identity for applications to use when connecting to resources that support Azure Active Directory (Azure AD) authentication.
Why not use Role-Based Access Control (RBAC)?
While Role-Based Access Control (RBAC) is a common practice in many Azure services to manage access, when it comes to Databricks, there are specific reasons to opt for Databricks' own access control management:
- Customized Access Control: Databricks provides its own specialized access system, allowing for direct integration with Azure resources via Service Principals. This approach is tailored to Databricks' unique workflows and ecosystem.
- Granularity of Permissions: Databricks allows specific entitlements, such as workspace access or cluster creation. This refined control surpasses the often generalized permissions of traditional RBAC, granting precise access based on exact needs.
- Group-Based Assignments: Beyond just entitlements, Databricks facilitates the assignment of Service Principals to specific groups. This caters to varied levels of access needed for different jobs or notebooks, ensuring both security and flexibility.
In summary, while RBAC is a valuable tool for many Azure services, when working within Databricks, leveraging its custom access control mechanisms can offer more precise, flexible, and streamlined management of permissions and access.
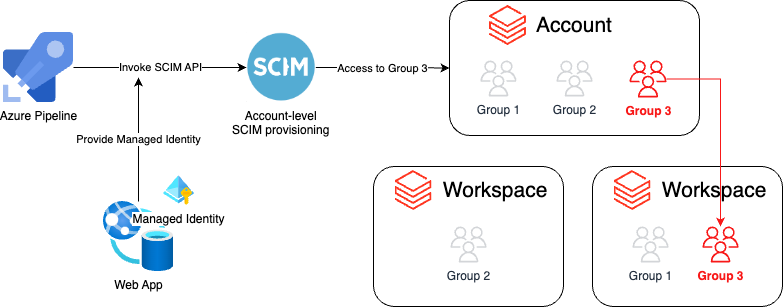
In order to programatically setup these permissions we can leverage the SCIM API to assign a managed identity and assign it to a group. These groups can have specific entitlements for specific workspaces. One way to do this is shown in the diagram below:
Setting Up a Managed Identity
To set up a managed identity for your existing Web App, you'll need to follow these steps:
- In the Azure Portal, open the Web App
- Click on "Identity" and enable "System assigned managed identitiy".
- Copy the generated "Object (principal) ID" and search for the associated Enterprise Application in Azure Active Directory.
- Copy the associated Application ID, as we will need this to configure Databricks.
Assigning the Managed Identity to Databricks
After creating the managed identity, you'll need to assign it to your Databricks workspace:
1. In the Azure portal, go to your Databricks workspace.
2. In the Admin settings (right top), go to the "Service principals" section.
3. Click on Add Service Principal, add the Application ID you copied earlier and tick "Allow workspace access" to ensure the Service Principal has sufficient privileges to run notebooks.
Running Databricks Notebooks from a Web App
Now that we have a managed identity set up and assigned to Databricks, we can use it to run Databricks notebooks from a web application. Here's how:
- In your web application, use the Azure SDK to get a token for the managed identity. This token will be used to authenticate to Databricks.
- Use the Databricks REST API to create a new job. The job should be configured to run the notebook you want.
- Start the job using the Databricks REST API. You'll need to include the token you got in step 1 in the Authorization header.
Here's a sample code snippet in Python that shows how to do this:
from azure.identity import DefaultAzureCredential
from azure.databricks import DatabricksClient

# Get a token for the managed identity
credential = DefaultAzureCredential()
token = credential.get_token('2ff814a6-3304-4ab8-85cb-cd0e6f879c1d')

# Create a Databricks client
client = DatabricksClient(base_url='https://<databricks-instance>', token=token.token)

# Create a new job
job_id = client.jobs.create({'notebook_task': {'notebook_path': '/path/to/notebook'}})

# Start the job
client.jobs.run_now(job_id)
With this setup, you can securely run Databricks notebooks from your web application using a managed identity. The same applies for other services that support managed identity (e.g. Azure Functions, Azure Container Instances, AKS, etc) and the same also applies for User Assigned Managed Identities instead of System Assigned Managed Identities.
Automate deployment using Terraform
Instead of configuring the managed identity manually, we can leverage the azure and databricks terraform providers to automate the creation of the managed identity and attaching it to a databricks cluster. The databricks providers uses the SCIM API under the hood, and here's an example how to tie everything together in terraform:
provider "azurerm" {
  features {}
}

data "azurerm_databricks_workspace" "workspace" {
  name                = "your-databricks-workspace-name"
  resource_group_name = "your-databricks-rg-name"
}

provider "databricks" {
  host                        = data.azurerm_databricks_workspace.workspace.workspace_url
  azure_workspace_resource_id = data.azurerm_databricks_workspace.workspace.id
}

resource "azurerm_resource_group" "example" {
  name     = "example-resources"
  location = "West Europe"
}

resource "azurerm_service_plan" "example" {
  name                = "example"
  resource_group_name = azurerm_resource_group.example.name
  location            = azurerm_resource_group.example.location
  os_type             = "Linux"
  sku_name            = "P1v2"
}

resource "azurerm_linux_web_app" "example" {
  name                = "example"
  resource_group_name = azurerm_resource_group.example.name
  location            = azurerm_service_plan.example.location
  service_plan_id     = azurerm_service_plan.example.id

  site_config {}

  identity {
    type = "SystemAssigned"
  }
}

/*
The code below adds the Managed Identity service principal to the databricks
admin group using the Databricks Terraform Provider.

This is required to allow the WebApp to access the Databricks REST API.
*/
data "databricks_group" "admin" {
  display_name = "admin" // existing admin group in databricks workspace
}

resource "databricks_service_principal" "sp" {
  application_id = azurerm_linux_web_app.example.identity[0].client_id
  display_name   = "appsvc-id"
}

resource "databricks_group_member" "admin_group" {
  group_id  = data.databricks_group.admin.id
  member_id = databricks_service_principal.sp.id
}
Wrapping up
Managed identities offer a secure and simple way to authenticate to services like Databricks. By using a managed identity, you can eliminate the need to store sensitive credentials in your code and simplify your authentication process. Assigning the managed identity to Databricks, allows us to have granular control on what the identity (i.e. Web App) can access and this will allow you to e.g. trigger Databricks workloads from other resources in Azure.